Creating UMG Text Tattoos
Introduction
You’ll first need to choose the best painting workflow for your usecase. This is especially important for Text, because seamless text/decal projection is currently supported only for world-space / local-space painting.
Therefore, even if your mesh is non-planar1 but your effect can be convincingly a laid out along two axes (for example, a shirt name for a character can probably be laid out along just the YZ plane), then you should favor the local-space/world-space workflow over a full 3D projection (i.e. mesh-space workflow).
Before proceeding further, be sure to read the Choosing your workflow and Preparing your Mesh for painting articles which discuss these topics in more detail.
1 Non-planar refers to complex 3D models that carry significant geometry along all three axes. In contrast, planar models are things like floors/walls/landscapes/etc, all of which can be approximated along any two axes such as XY/XZ/YZ.
Creating Text Effects
The two main nodes for creating text effects are Paint Text and Paint Text At Component.
You will invoke these from your Bluperints or C++ code and pass in a Hit Result (or Relative-location/Socket-name) along with your text, font style, etc. These nodes will generate textures that can be read inside your materials to render the text on your meshes.
Here’s what the nodes look like:
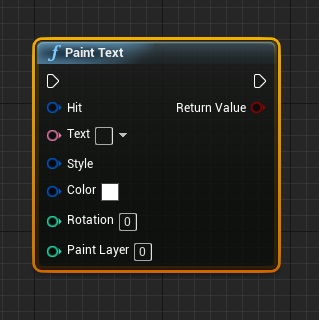
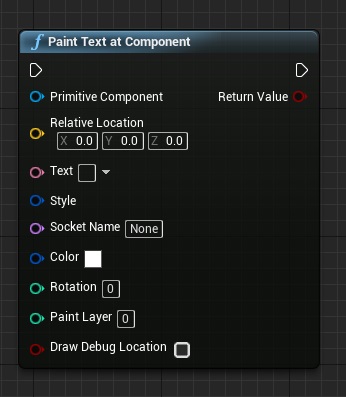
For more information on using these nodes, check out the Paint Text and Paint Text At Component reference pages. For now we’ll move on to setting up your materials to receive the text.
Rendering Text Effects
After your Blueprints to create the text effects are in place you’ll need to setup your materials to actually receive your paint.
Fortunately all you need is a single material UV node from the following list:
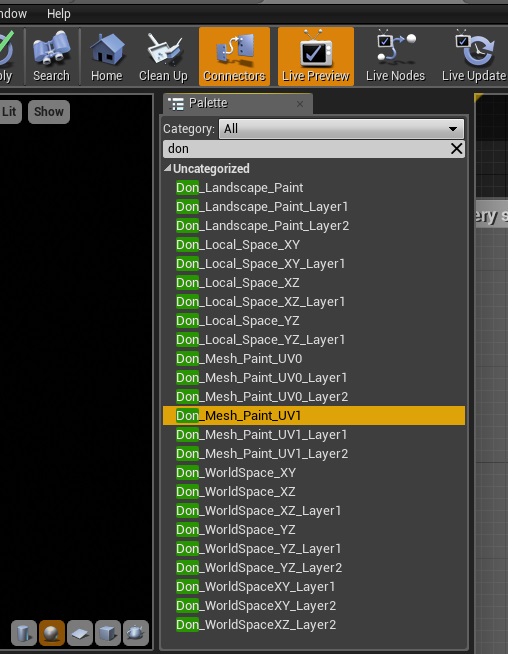
For learning which node you need for your particular usecase, review the choosing your workflow article to ensure you’re choosing an optimal workflow for the task at hand.
After choosing your node, all you need to do is drop it in your material and use the RGB channels to extract a paint mask. Because Unreal’s Canvas text rendering doesn’t support alphas, the alpha channel is not going to contain any meaningful information and you’ll instead need the RGB channels to pack information. For example, you can use the R channel to control your text’s emmissive/metallic output while the B channel can be used to indicate the actual text mask.
Here’s an example which uses this technique from the sample project’s “UMG hot-text stamping booth”.
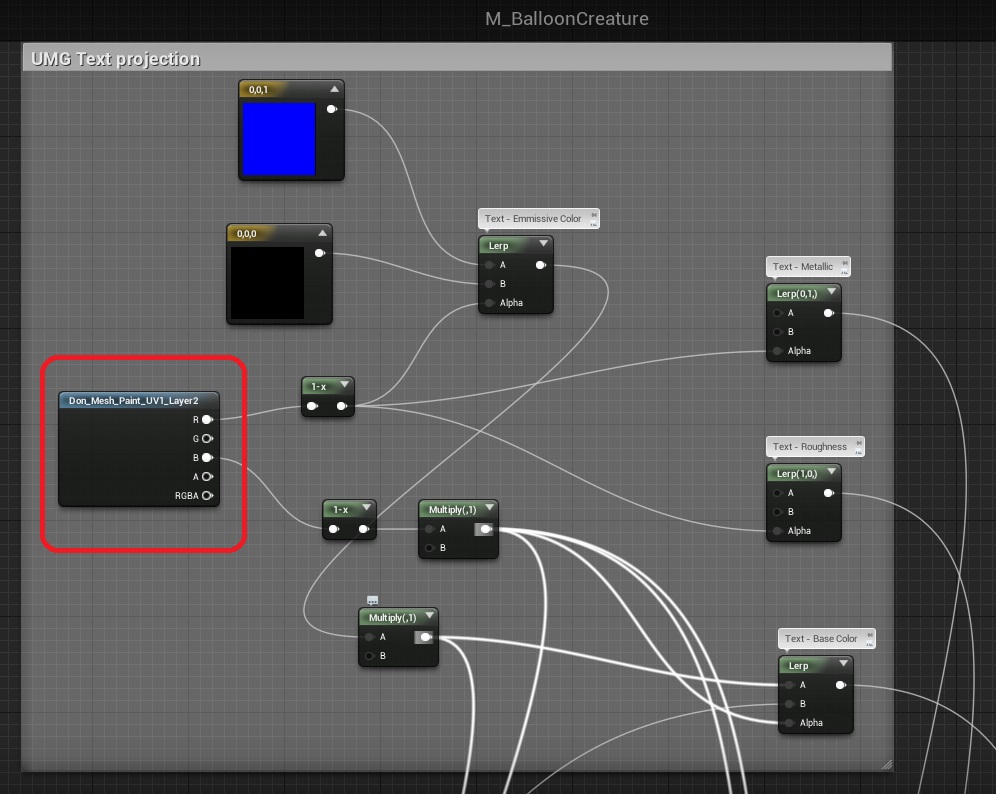
Observe how the Don_Mesh_PaintUV1_Layer2 node is used to achieve 3D projection via a lightmap channel on UV1. Layer 2 is used, because Layer 0 and Layer 1 on this material already busy handling other effects not related to text. Using layers is a great way of allowing a single material to use text and paint effects that are fully independent of each other.
It is possible to optimize this example further by approximating shirt names/numbers along the skeletal mesh’s YZ plane by using the Don_Local_Space_YZ workflow. This will yield better performance, a simpler workflow (no need for lightmap UV1) and allow for fully seamless painting (because we’re doing location based planar mapping). This exercise is left as homework to the reader 🙂
Caveats for allowing players to stamp Text
While allowing the player to stamp custom text at a pre-determined socket is easily handled by the Paint Text At Component node, you may be tempted to also allow the player decide where the text is stamped using the Paint Text node.
However, there are some caveats you should be aware of in both cases:
- If you are allowing players to enter custom text, make sure you restrict the text length, font size or both, to ensure that the text doesn’t overflow across the shirt’s faces.
- If you are allowing players to choose the text location as well, then a planar workflow (world-space/local-space) is highly recommended over 3d projection (mesh-space workflow).
- Because 3d text projection is not seamless, your mesh-space UVs (we’re talking about the lightmap UV1 here, not UV0) will need to be very carefully designed to prevent unsightly text spillovers across UV seams. For simple cases like a broad character’s torso you may be able to get away with it, but for things like tattoos on faces, arms, necks, etc, careful lightmap UV prepartion is a must.
Be sure to study the sample project’s “UMG Hot Stamping booth” example to understand the strengths and weaknesses of this plugin’s text painting features.